
Owen Parkins
Setting up OpenVAS in Master and Slave Architecture
Published Nov 22, 2019
Setting up OpenVAS in Master/Slave Architecture
OpenVAS is an open source vulnerability scanner. In single instances, the OpenVAS package will install all the components required to successfully scan a network. But, some of those packages are resource intensive and difficult to run on older hardware. The current approach at New Mexico Institute of Mining and Technology (NMT) in the CyberCorp Scholarship for Service (SFS) class is to install the full OpenVAS package on all machines that are used for security audits. At the time, simplicity was champion over the best architecture option: master/slave.
The master/slave architecture allows all scans to be managed from a single location. While this does introduce a single point of failure, it also simplifies the management of the security audit. All scans are returned to a single location where the students are able to analyze the results. This is a major improved compared to our previous distributed approach of students being responsible for specific subnets and machines. The old scheme was complicated because client networks are rarely setup correctly and some machines would be on the same subnet, while others would accidentally be skipped. Getting all students, who are still learning about OpenVAS, on the same page resulted in a significant waste of time. In addition, if anything happens to the machines before the students were able to grab the scans, we would not be able to use that data in our report. If the machine goes down while scanning, this architecture doesn’t solve those problems, but this architecture will automatically syncs the results back to the master after a scan is completed.
Goals
The goals of this project include:
- Learn more about OpenVAS and its architecture. OpenVAS is a monster of a project that I have not had time nor a reason to investigate further then getting it running on older hardware.
- Setup the new infrastructure for security audits inside the SFS project. This is because of the already mentioned reasons.
- To fulfill the requirements of a final project for my Incident Response class at NMT.
Background Information
The structure of OpenVAS is displayed below:
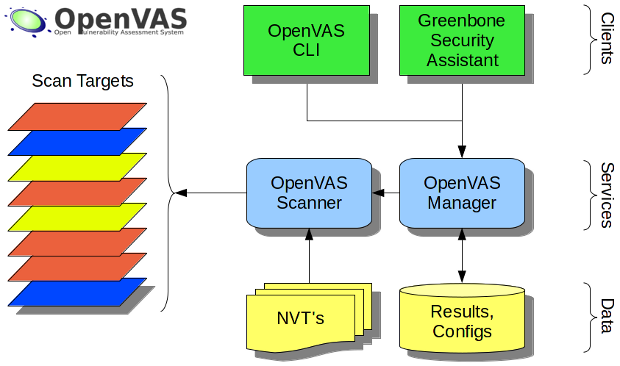
Source: https://en.wikipedia.org/wiki/File:OpenVAS-7-Structure.png
The image above is for OpenVAS 7 which is two versions old as of November 22, 2019. The structure of OpenVAS has remained largely unchanged through the versions
Originally, the scanner, manager, and Greenbone Security Assistant (GSA) were all installed on each machine that the security audit team used. Each component has an important role in the OpenVAS structure:
Scanner
The scanner is what scans the network. It is separated in the OpenVAS infrastructure to allow for third party scanners to be added. The scanner module is purposefully designed to be generic to allow scanners the ability to scan different targets such as networked machines, websites, and more.
The default OpenVAS scanner uses “a regularly updated feed of Network Vulnerability Tests (NVTs), over 50,000 in total” (tools.kali.org). This scanner will scan machines connected to the same network and use the NVTs to determine if the machine is vulnerable. Thus the scanner requires the NVTs to be downloaded and prepared before it will work correctly.
The scanner uses the OpenVAS Scanner Protocol (OSP) to communicate with managers. The protocol is a “XML-based stateless request-response API that offers a unified abstraction for vulnerability scanners.” For more information, see the Greenbone Documentation.
In the master/slave architecture, the slave node only needs to be running the scanner component. While the scanner does use most of the processing power when running, it is beneficial that the machine does not need to be running any other services.
Manager
The manager component provides an interface between the scanner and any clients. The manager has the ability to control multiple scanners. In a master/slave architecture, the manager is the running only on the master node. The manager provides a single interface to manage all the scanners from the client software used.
The manager uses the OpenVAS Management Protocol (OMP). This protocol is allows for any client to interact with the manager. For more information, see the Greenbone Documentation
Greenbone Security Assistant
Greenbone Security Assistant (GSA) is client software that interacts with the manager. By itself, GSA is just a fancy GUI that issues commands to the manager. The GSA allows for easy task creation and display of results for users.
Creating Master/Slave Environment
It was first attempted to create this project in Docker containers. The original
idea was to use docker-compose to instantiate a test network with the
master/slave architecture working. The issue that was encountered was the
requirement to run a redis server. The scanner requires redis to be running and
accessible through a a unix socket file. While this is not an impossible hurdle
to overcome, it made the creation of the docker containers not as appealing as
other methods. Instead, step-by-step instructions were created to automatically
setup the architecture on Google Cloud Platform with a Debian9 image. An
ansible script would have been an appropriate substitute, but Google Cloud
Platform does not natively support the same Linux that NMT uses on security
audit machines, Kali Linux. Supporting the same image is important because the
work from this project will be taken as a model, and applied to the security
audit machines at NMT.
This setup does not have the best security practices in place. The idea behind this write-up is to have a starting place to setup this infrastructure. Recommendations on what to change are listed after the main instructions.
Setting up the Certificate Authority
OpenVAS requires a certificate authority (CA) to be setup. The OpenVAS manager will use certificates to authenticate with the slave and the slave will verify the manager’s identity with the certificates. This provides a secure communication channel without passwords being sent.
Setting up the Master Node
Run all the following commands as root
Setting up a CA
To create a CA easily, we will use EasyRSA:
wget https://github.com/OpenVPN/easy-rsa/releases/download/v3.0.6/EasyRSA-unix-v3.0.6.tgz
tar xzvf EasyRSA-unix-v3.0.6.tgz
cd EasyRSA-v3.0.6/
Now we need to setup the CA:
./easyrsa init-pki
./easyrsa build-ca
Fill out the values as you want. This will generate the keys required to sign other certificate requests.
Save the certificate file that was generated at ~/EasyRSA-v3.0.6/pki/ca.crt
for later use. This file will need to be copied to the slave node.
Creating Client Certificate
To create the client certificate:
./easyrsa gen-req ManagerClient nopass
./easyrsa sign-req client ManagerClient
Creating Server Certificate
To create the server certificate:
./easyrsa gen-req ManagerServer nopass
./easyrsa sign-req server ManagerServer
Install OpenVAS
First, install the required packages:
apt update; apt install -y openvas-manager greenbone-security-assistant
Now install the CA certificate. Look carefully at the paths and adjust as needed:
mkdir -p /var/lib/openvas/CA/
cp ~/EasyRSA-v3.0.6/pki/ca.crt /var/lib/openvas/CA/cacert.pem
Now install the Client certificate and key. Look carefully at the paths and adjust as needed:
mkdir -p /var/lib/openvas/private/CA/
cp ~/EasyRSA-v3.0.6/pki/issued/ManagerClient.crt /var/lib/openvas/CA/clientcert.pem
cp ~/EasyRSA-v3.0.6/pki/private/ManagerClient.key /var/lib/openvas/private/CA/clientkey.pem
Now install the Server certificate and key. Look carefully at the paths and adjust as needed:
cp ~/EasyRSA-v3.0.6/pki/issued/ManagerServer.crt /var/lib/openvas/CA/servercert.pem
cp ~/EasyRSA-v3.0.6/pki/private/ManagerServer.key /var/lib/openvas/private/CA/serverkey.pem
Starting OpenVAS
Now we need to start the services:
systemctl start openvas-manager
systemctl start greenbone-security-assistant
Setting up the Slave Node
First, install the required packages:
apt update; apt install -y openvas-scanner bzip2
Creating Server Certificate
Now we need to create and sign our slave certificates with our CA we created on the master. Following best practices, we will create the certificate signing request on the slave and transfer the request to the master node.
To create our certificate signing request, we will use EasyRSA again:
wget https://github.com/OpenVPN/easy-rsa/releases/download/v3.0.6/EasyRSA-unix-v3.0.6.tgz
tar xzvf EasyRSA-unix-v3.0.6.tgz
cd EasyRSA-v3.0.6/
Now we need to setup our slave properly:
./easyrsa init-pki
And create our certificates:
./easyrsa gen-req SlaveServer nopass
Now copy the SlaveServer.req file to the master and run ON THE MASTER NODE.
Look carefully at the paths and adjust as needed:
./easyrsa import-req /path/to/req/file SlaveServer
./easyrsa sign-req server SlaveServer
Now copy the SlaveServer certificate file and the CA certificate back to the slave node.
Installing the Certificates
Now that we have the certificates, we need to install them for OpenVAS to work properly. These locations are the same for the master node.
Now install the CA certificate. Look carefully at the paths and adjust as needed:
mkdir -p /var/lib/openvas/CA/
cp /path/to/ca.crt /var/lib/openvas/CA/cacert.pem
Now install the Server certificate and key. Look carefully at the paths and adjust as needed:
mkdir -p /var/lib/openvas/private/CA/
cp /path/to/SlaveServer.crt /var/lib/openvas/CA/servercert.pem
cp ~/EasyRSA-v3.0.6/pki/private/SlaveServer.key /var/lib/openvas/private/CA/serverkey.pem
Editing OpenVAS-Scanner service files
After the scanner is installed, we need to edit the service files to start the
OpenVAS scanner the way we want it to. Open
/lib/systemd/system/openvas-scanner.service in a text editor and change the
following lines:
ExecStart=/usr/sbin/openvassd --listen=127.0.0.1 --port=9391
TO
ExecStart=/usr/sbin/openvassd --listen=0.0.0.0 --port=9391
This will make the OpenVAS scanner available from the network. This is not the most secure method, even with the certificates for authentication. Instead, it is recommended to use ssh tunnels to provide the secure communication channel between the master and slave, but that is out of scope of this write-up.
Symbolic link for the socket
Redis/OpenVAS are temperamental creatures and can have trouble playing together. This is often when users start messing with preconfigured packages, like what we are doing right now. Once solution to avoiding systemd creating a private tmp directory is to create a symbolic link to where OpenVAS is looking for the socket file:
ln -s /var/run/redis/redis.sock /tmp/redis.sock
Another solution is to edit the systemctl files for redis, though sometimes an error arises. This is heavily dependent on your operating system. The important thing is that OpenVAS can find the Redis socket.
Reload systemctl files
Now we need to reload the service files for anything to take effect:
systemctl daemon-reload
Restart the services
And now we can finally start the services
systemctl restart redis
systemctl start openvas-scanner
You will have to now sync the NVT feeds with the scanner. One script to help is
https://github.com/greenbone/openvas/blob/master/tools/greenbone-nvt-sync.in.
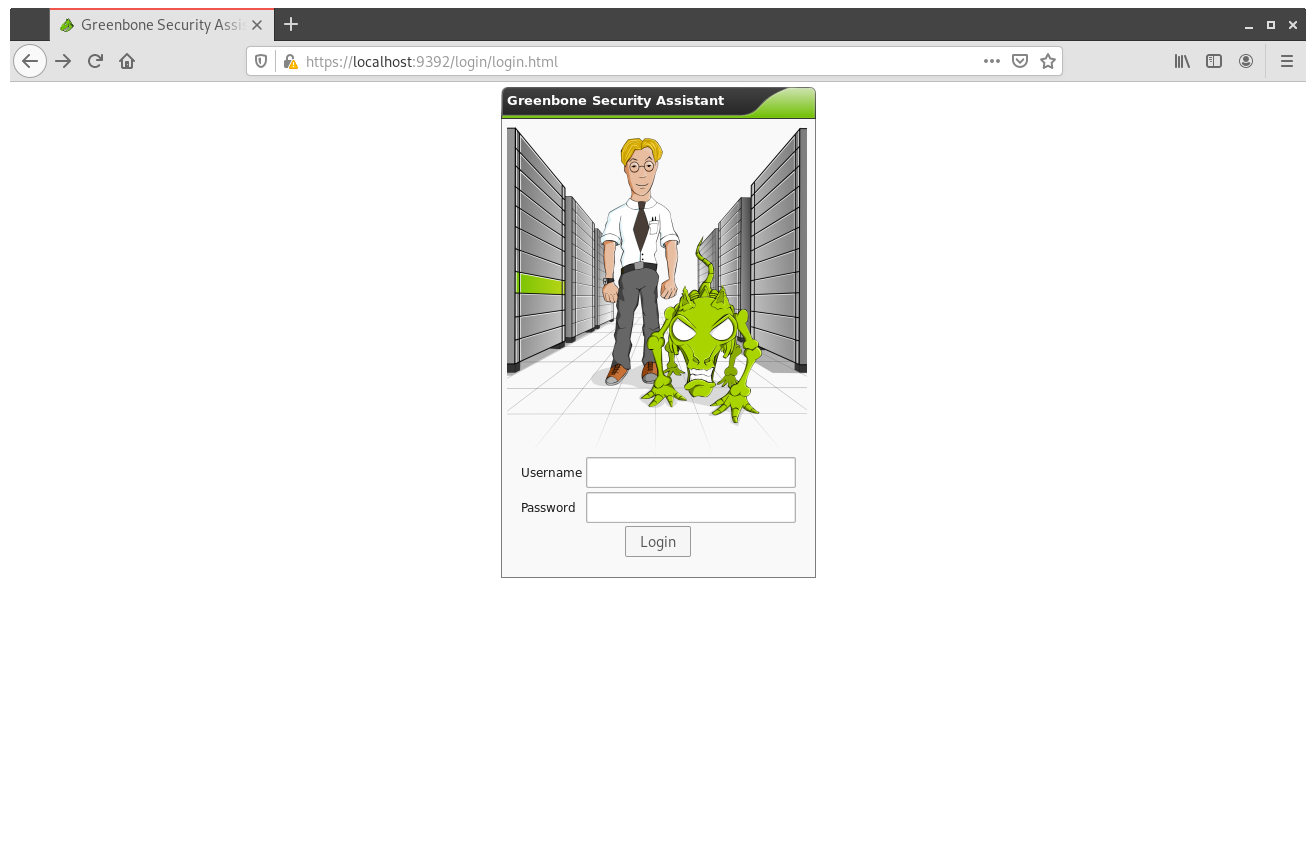
Signing into Greenbone Security Assistant
First, we need to create an user account with the manager node. On the manager node, type:
openvasmd --create-user=admin
Save the password that is displayed. Go to https://<your host>:9392 in your browser
and sign into the service:
Now, go to Configuration->Scanners. This is where all the scanners will be listed. There will be a default of a localhost scanner. There will be a start icon, select it. Now you will be presented with the add scanner screen:
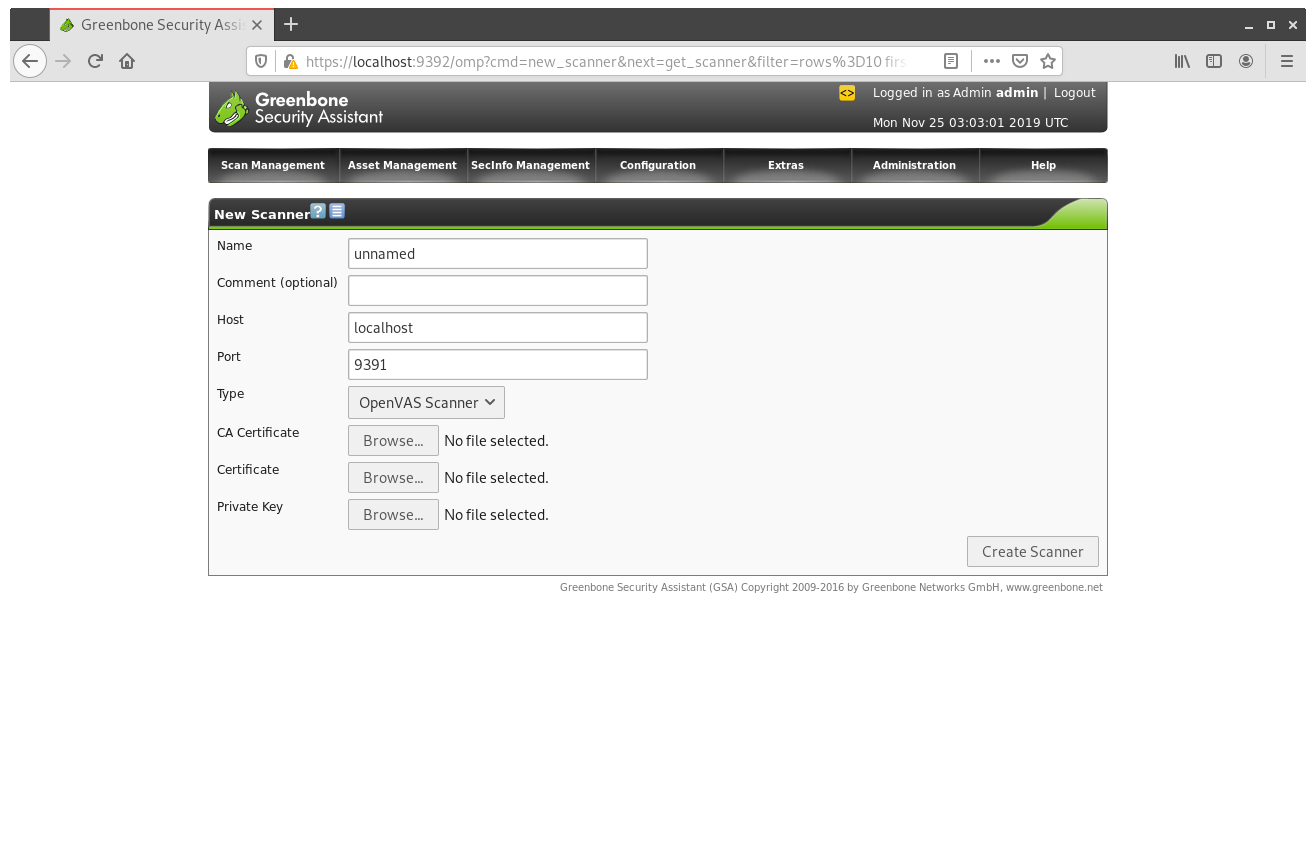
The Certificate/Private Key required uploads are the Client certificates that we created earlier on the master node. After all the files are uploaded, create the scanner. Then there will be a button to verify that the scanner is connected.
Once you have verified that the scanner is connected, create a scanning task like normal, but select the new scanner in the dialog box.
Conclusions
Separating the scanner and manager is useful with scaling up scanning operations. Separating the components allows for one manager to be the central hub where the scan can be orchestrated. This expedites the scanning process because there is no reason to collect the data from many nodes.
The downside of this architecture is the manual install. There are no packages that automatically setup this kind of infrastructure which means someone needs to be familiar with the setup to fix any issues. This documentation was created to provide the support needed for future NMT students who need to work with this infrastructure.
Implementation Suggestions
Use SSH
Currently, the master has to reach out to the slave to initiate the connection. While this is fine in a normal environment, it does not work well behind firewalls. Most firewalls allow outbound connections, so a common workaround when performing audits is to setup a reverse ssh tunnel. The same should be done for this architecture. The slave would initiate the ssh tunnel, and set it up properly. Then the master would connecting to the remote node, and the ssh tunnel would connect it to the master properly.
Compile OpenVAS
Another option that should be explored is compiling OpenVAS from scratch. It appears that many problems arise when OpenVAS is retrieved from the repositories of the distribution. It appears that the individuals who compiled OpenVAS have some assumptions in how OpenVAS will be used, so it causes issues when other architectures are attempted. This was evident when writing this tutorial. I tried several different workarounds for various problems, but it appeared that various applications would not use configuration files. By compiling OpenVAS yourself, you use your own assumptions which might make some of this easier.